
Duct Tape Dummy Tutorial
Please follow this method when making your Duct Tape Dummy. This method will benefit both you and your maker.

Materials
1. Painter's Coveralls with a zipper.
2. 2-3 Rolls of Nashua General Purpose Tape
3. Medical Scissors
4. Scissors
5. X-Acto Knife
6. Posts and/or objects of similar height for wearer to rest arms on. (not pictured)
7. Sharpie Marker

Preparation
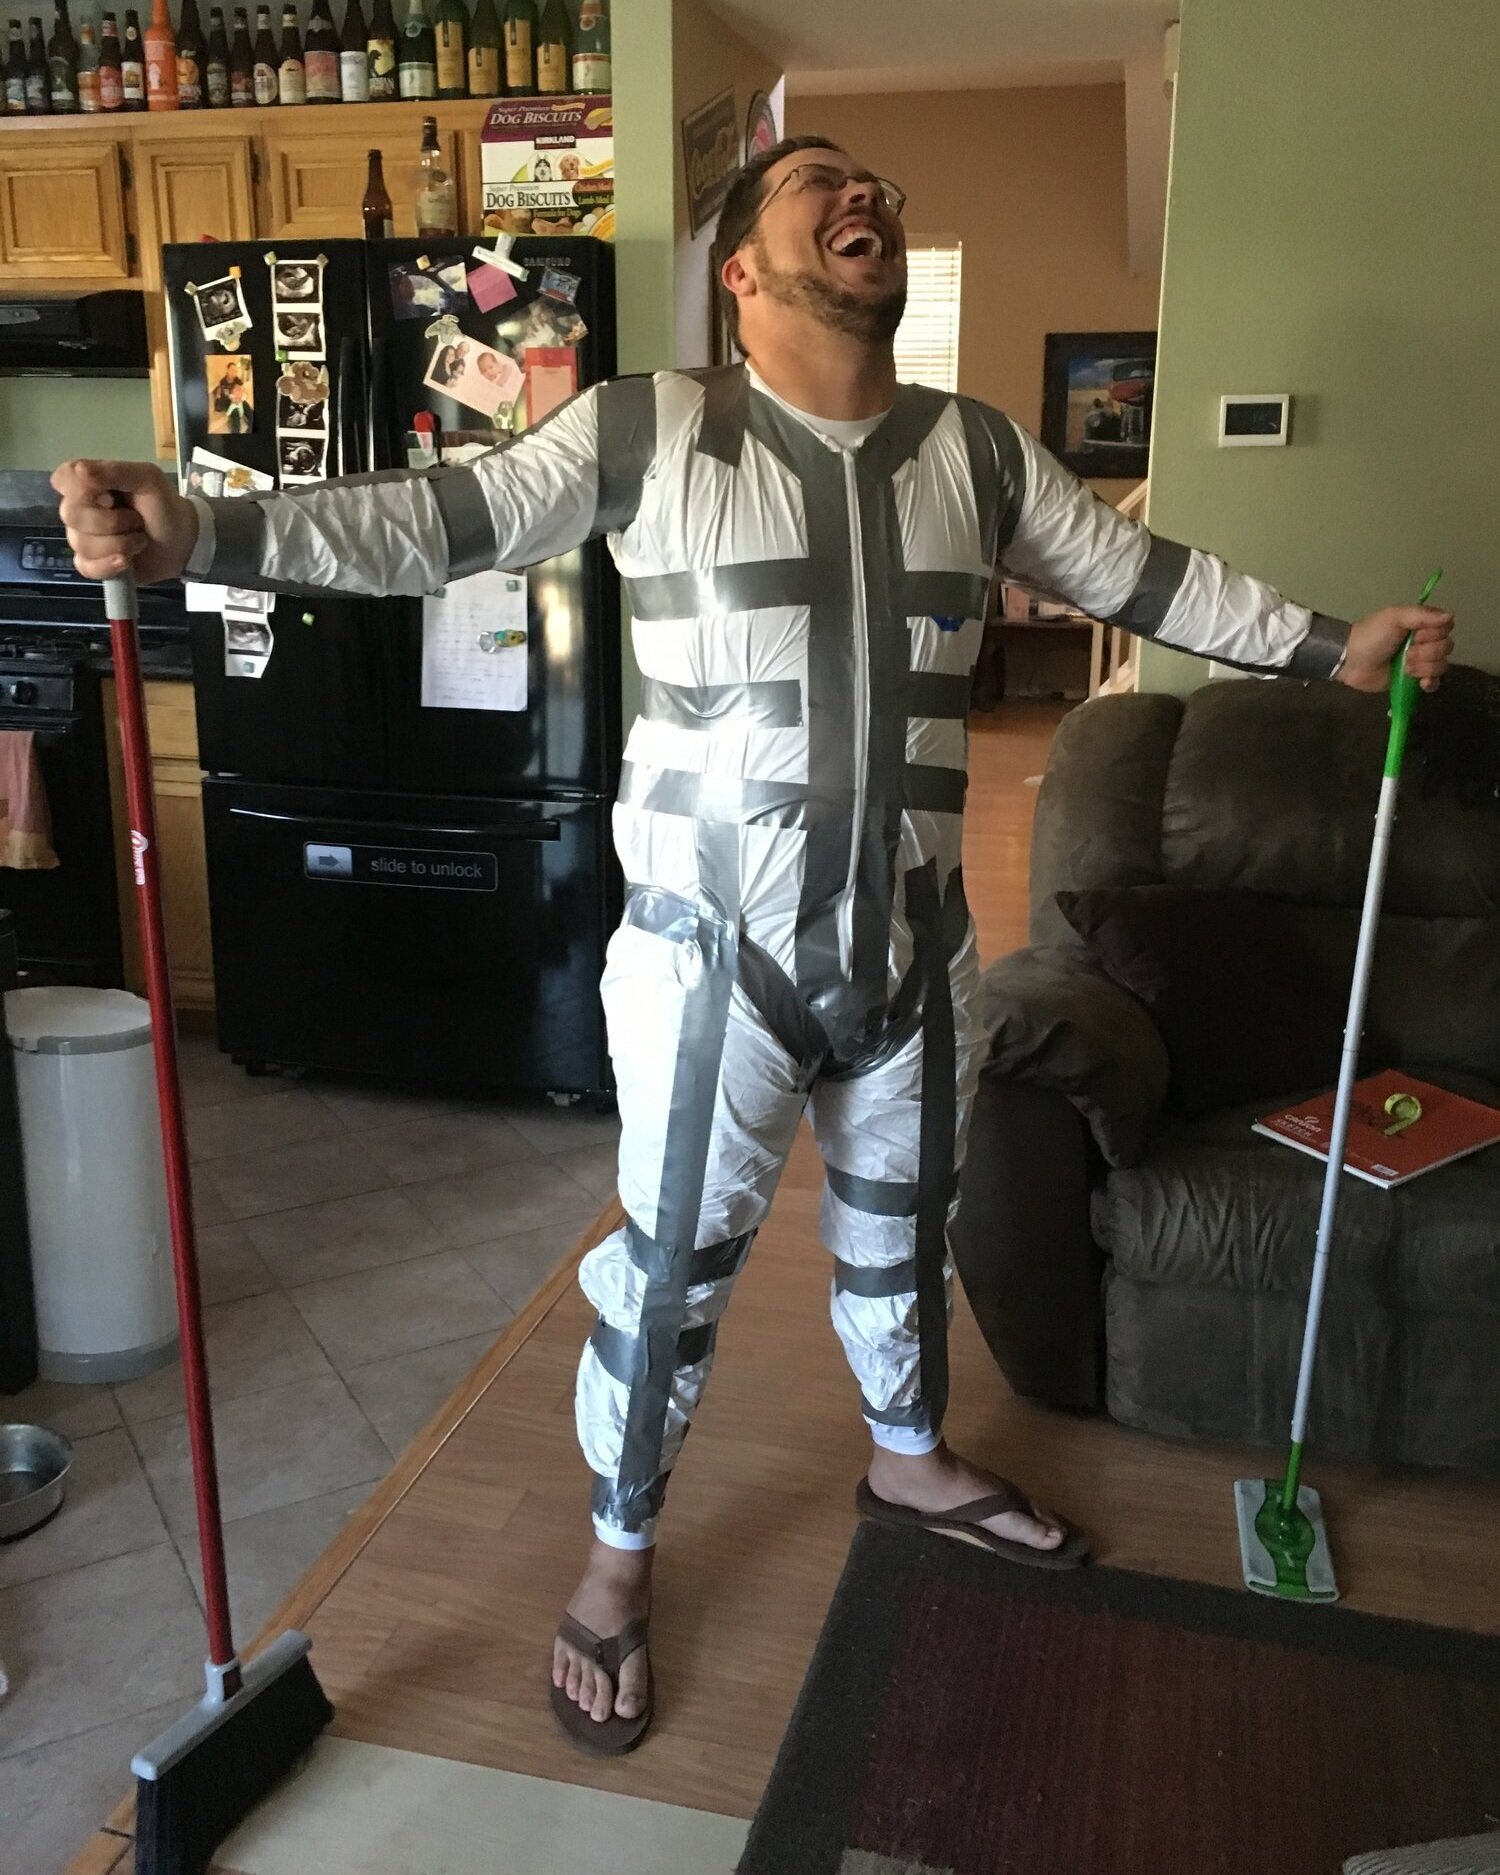
Be sure to have your wearer fed, hydrated, and have used the restroom before starting. Have them stand in comfy shoes on a comfy surface as their feet may get fatigued from standing for so long. Making a duct tape dummy can take anywhere from 1-2 hours depending on how much help is available. Having two people to help is best advised as one person can cut and prep strips while the second person applies them to the dummy. Have the wearer stand with their feet at least shoulder width apart. Next have them have their arms straight out in a "T" shaped pose. Having the arms straight out with the legs further apart helps the maker ensure proper tailoring of the bodysuit in the armpit and groin areas. You are now ready to begin taping.


Step 1 - The Foundation
1A. First take the tape to find the bottom most point of the zipper that would make it easier for the wearer to get out of the dummy later. Think of it as where an open zipper on a pair of jeans would land for them. Take the tape from this point and run it through their legs, under the groin, then up the rear to help establish where the crotch is. Making the crotch too low can affect the tailoring of the bodysuit. After this is done, wrap around the upper thigh and hip area like a climber's harness to help further establish the hip and groin area.
1B. Second, wrap the tape around the armpits snug to the body to help define them. Doing this and taping the crotch/groin areas first will help keep the dummy from shifting during taping.
1C. Next wrap tape around the wrists and ankles to establish them. You may use paper towels under the coveralls to help extend them, and make for easier cutting out later, but it's not needed if the dummy is taped carefully.
1D. Once that's done, wrap around the collar area then down along the zipper. Make sure not to cover the zipper's teeth, as the zipper will be needed later for the wearer to get out of the duct tape dummy. Taping over the seams of the zipper is recommended to help the zipper not tear away when the dummy is stressed and tugged on.
1E. Next take long strips of tape and run them along the front & back of the legs, top & bottom of the arms, and up the middle of the wearer's back. This will help make a "spine" structure to the limbs and backside.
1F. After that, wrap around high points on the arms, legs, and torso to help tuck the coveralls closer to the wearer's body. Good points for this would be around the shoulders, elbows, chest, waist, hips, and knees. You are now ready for step two..


Step 2 - The Taping
2A. If you have a helper, have them prep a bunch of strips of duct tape in various lengths from 6" - 12". If you do not have a helper, you can do this step before hand to help save some time.
2B. Begin taping the wearer at the torso. It's best to apply the tape at random, overlapping it in a criss cross pattern. DO NOT MUMMY WRAP. This will weaken the dummy and make it fall apart when the maker stuffs it and uses it to tailor the bodysuit. Criss crossing the strips helps make the dummy stronger and last much longer.
2C. After taping the front and back of the torso, work your way to the legs. Be sure to continue taping in a criss cross pattern all around the front, back, and sides of the legs. Again, do not mummy wrap!
2D. After both the torso and legs are done, move on to the arms. We like to save the arms for last for better comfort of the wearer. They will still have the ability to rest and move their arms up until it's time to tape them. Once again, do not mummy wrap the tape!
2E. After you have taped the entirety of the wearer's body, go over it to check for any weak spots or loose tape ends. Anywhere you can see some of the coveralls between the tape should be taped over. After doing this, tape over any ends of tape that look like they could snag or curl up. You want your dummy to be smooth and solid. Once you're finished with this step, you're ready for step three.


Step 3 - The Removal
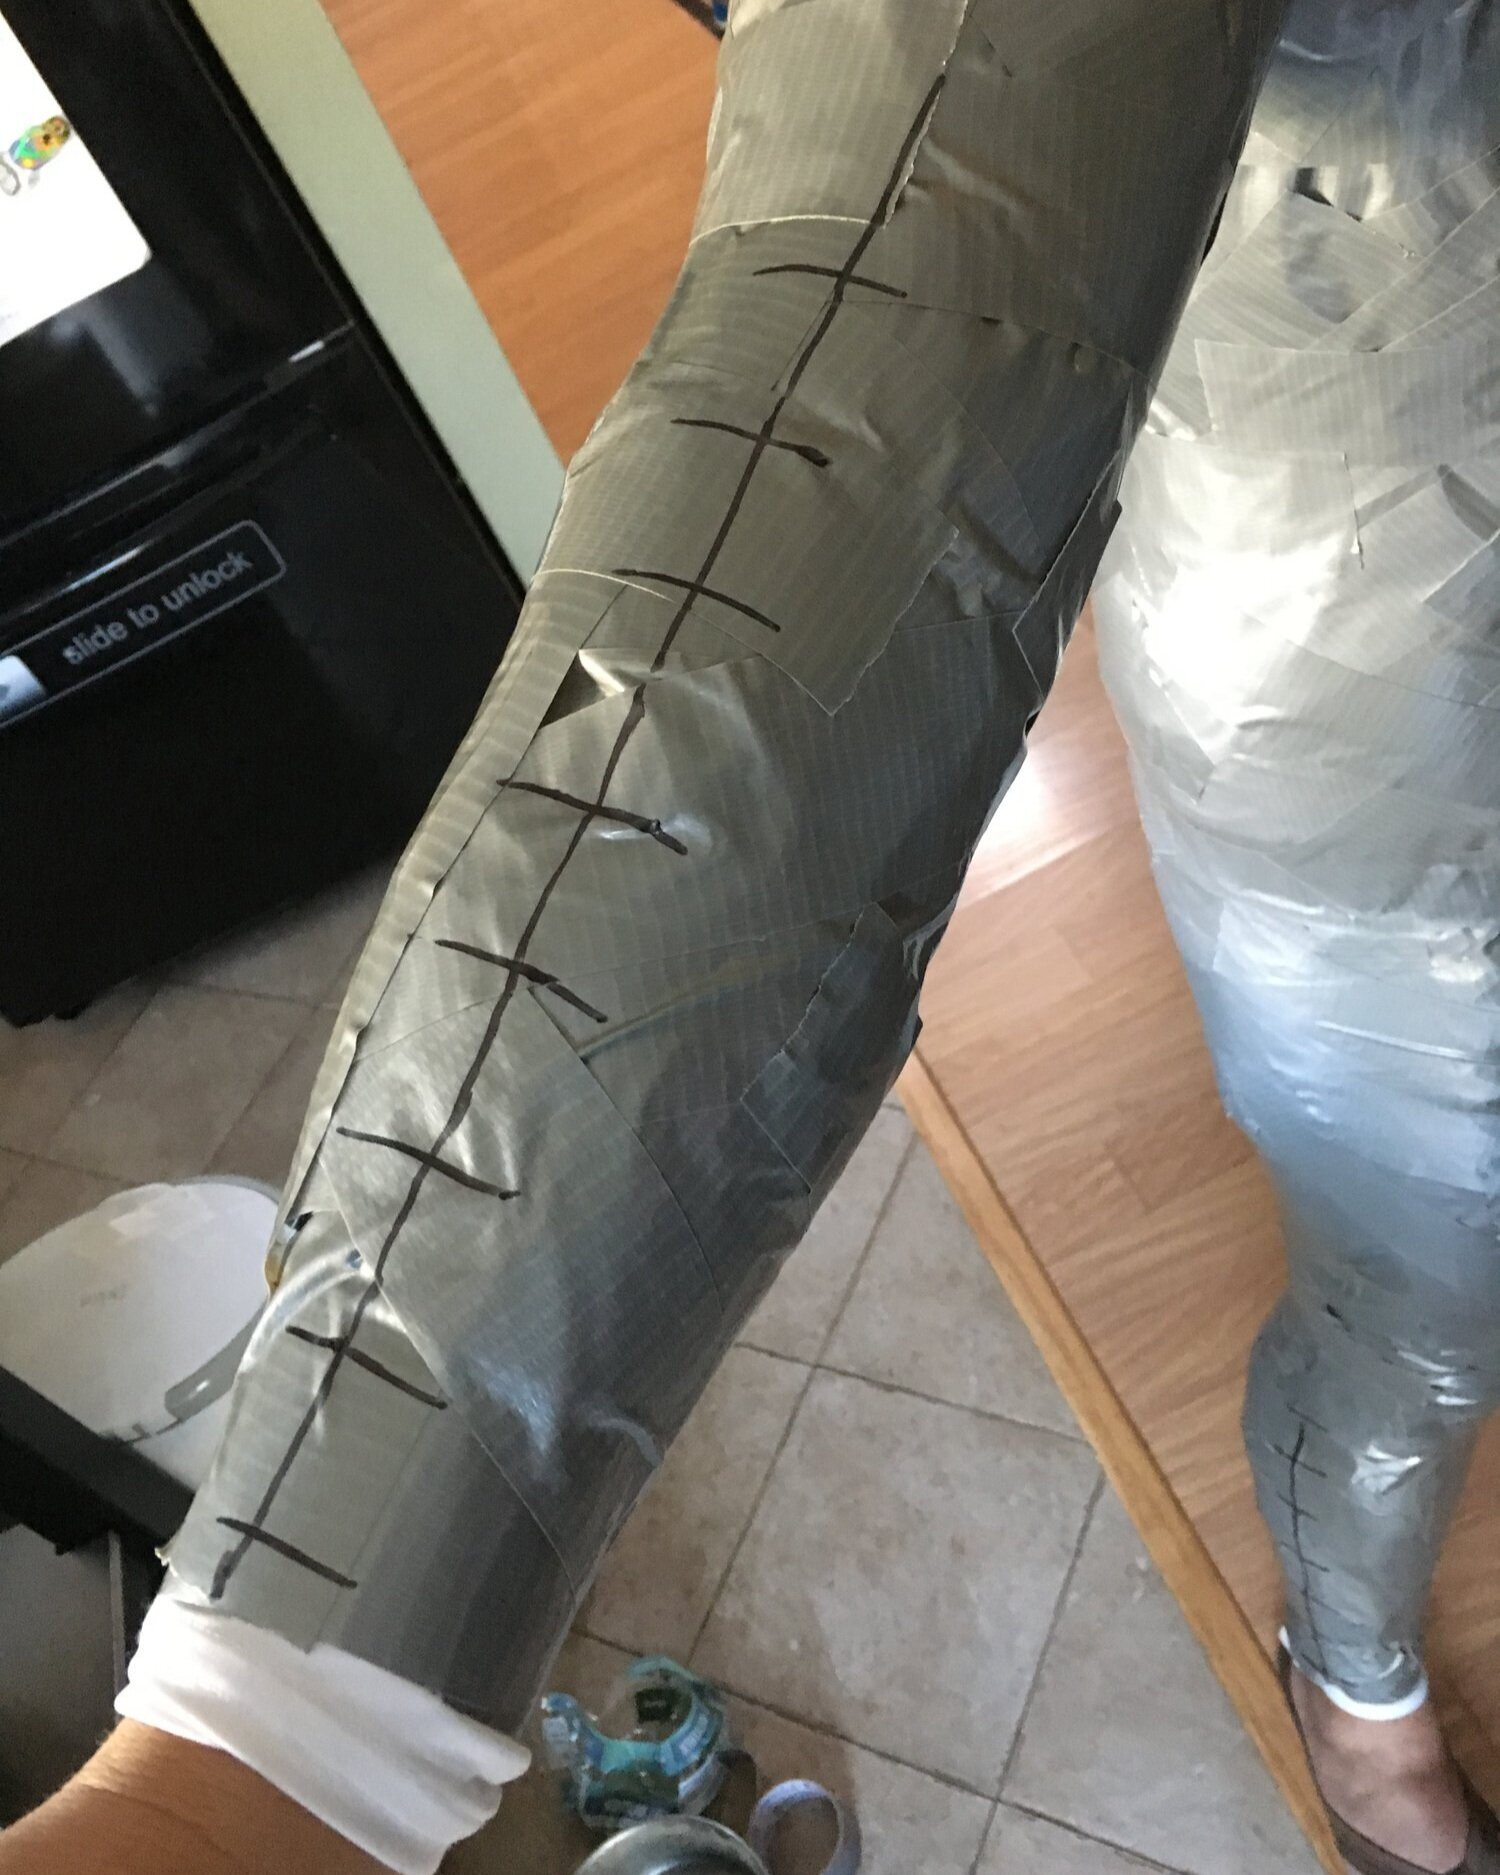
3A. Take your Sharpie marker and draw a straight line from the wearer's wrist to elbow. Then add little horizontal hash marks to the line. This helps the maker align the duct tape dummy properly during reassembly. Depending on how tight the upper arm/shoulder area is taped, you may need to extend this line higher than the elbow to get the wearer out of the dummy later.
3B. Next draw lines and hash marks on the outside of the legs from the ankle to the knees. If applicable, draw a circle with an X on the back side where the tail would go.
3C. Once your lines are drawn, it's time to remove the dummy. Take the medical scissors and carefully cut along the lines just drawn on the arms. Be careful not to cut the wearer's clothing being worn beneath the dummy. If the medical scissors aren't just cutting it well, you can use regular scissors or an X-Acto knife. Be sure to USE CAUTION as these tools are sharp, and can cut through to the skin of the wearer.
3D. Once the arm lines are cut, open the zipper in the front all the way down to it's taped end and help the wearer wiggle their arms free from the dummy. This will help relieve any fatigue they may have from holding their arms up for so long.
3E. Next take the medical scissors and cut along the lines drawn on the legs. Be careful not to cut the wearer's clothing beneath. If the medical scissors aren't just cutting it well, you can use regular scissors or an X-Acto knife. Be sure to USE CAUTION as these tools are sharp, and can cut through to the skin of the wearer.
3F. Help the wearer wiggle their legs out of the dummy. Once the dummy is off the wearer, straighten it out, and let it air out a bit before boxing it up and sending it to your maker.
3G. On the back of the dummy, write your character name, real name, and contact info for your maker. You're all done!
If you have any questions, you can email us at CreativeMochi@Gmail.com